Creating Tabs in Blogger
In Blogger, there is no inbuilt option to create tabs. So we're using a tricky way to create tabs. It is actually Labels that are playing the role of tabs here and we're simply displaying those labels in the form of tabs. I think now you get the picture of what's going to happen here. I'll bring it down step by step.
Step 1
You need to create a Post first. There are Pages too but since we can't label them, we're using Posts to do the tabbing. Here I've put a screenshot of a post I've created and see the Labels text box on the right side of the screen? There we can label our post. Yes you can add many labels and you can find that post under all those labels (tabs).

Step 2
Once you've created a post, you've to publish it. Click on the Publish button. Well, if you're not done with the post, you can save it as a draft and edit it later. But to see the page in the WWW, you've to publish it in the end.

Step 3
Once you've published the post, you'll be directed to a layout like the following image. There you can see all your posts published and saved as drafts. Next to the post title there are labels and we're going to use them in the process of making tabs. Now leave it be and move to the Step 4 where we actually start making tabs.

Step 4
Click Layout on the right side of the screen to view the layout of the blog and you can see a window like the following screen. Here you can edit the view of your blog. You can move stuff here and there and you can add gadgets and stuff and it's really cool. We're going to add a gadget from this view to enable us tabs. Click on Add a Gadget as in the screen.

Step 5
Add a Gadget opens a different window with many gadgets you can put into your blog. Main page is full of gadgets created by Blogger developers. Also there are gadgets created by 3rd party people other than Blogger. Feel free to try them all when you have time because one day they might come in handy. For now just stick to Pages gadget. Click on the + icon right next to the gadget and start adding it to the blog. There are few more steps to go.

Step 6
Now comes configuration of the Pages gadget. As you can see we've added this gadget under the header, it is appearing as a tab bar, the whole Pages gadget. Here we can edit, remove and add existing pages and external links. Under List Order, we can rearrange the order of how those tabs are appearing. We're going to add an external link. Click + Add external link and a dialog box will appear to enter the link address and a name.

Step 7
Remember you've created a post and published it to the WWW? Now we're going to visit that post. Go to your blog site and find that post. At the very bottom of that post, you can see the labels the post is having. Hover the mouse pointer and see? That's a link. Click on it and it will open a new page with all the posts under that label. That's the exact thing we're going to do by clicking on a tab, opening all the posts under a label name. Copy this URL from the address bar and go to Blogger again.

Step 8
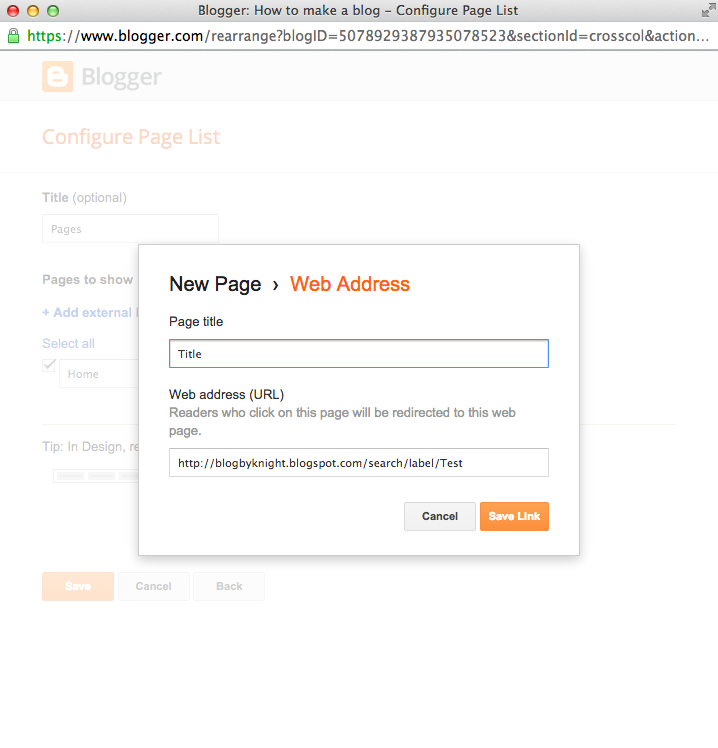
We've already clicked on + Add external link and we can get this screen. Now give an appropriate name to the Page title. This will be the tab name you'll be seeing. So make it as short as possible and as descriptive as you fit. In the URL text box, paste the URL that you've copied before. When you're done, click Save Link.
Step 9
You'll get the following familiar window again and there is a new item under List Order. When you're having too many tabs, you can arrange their order like I've told you before. Click Save and proceed to the layout once again.

Step 10
Finally! This is the final step. You've already created your first tab but it's still not published in the WWW. Now the journey begins. Click Save arrangement and let it out to be seen by everyone.

Before other people see it, You go and see how it looks!


Thanks for the article! It was really useful! :)
ReplyDelete